Setting Up Spec-Driven Development for Success
Ever wondered how you can stop "vibe coding" and start building actual value from your ideas in a structured and repeatable way.
The fix isn't a better prompt — it's a better starting setup. Specifically: a repository structure that gives AI assistants structured context, pins the environment so every contributor runs identical tooling, and built in Azure deployment so there's no gap between "works locally" and "running in Azure."
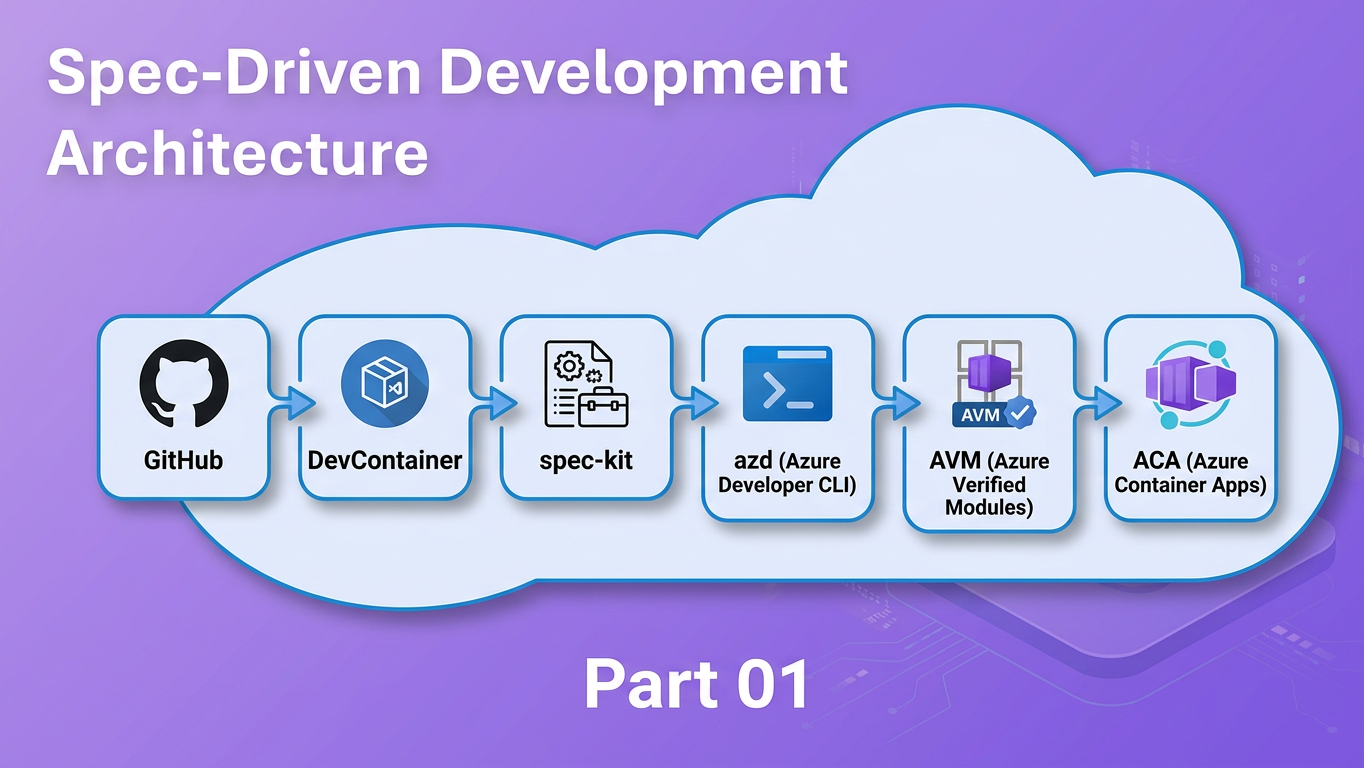
This post shows you how by combining three tools into one workflow:
- spec-kit — a CLI and VS Code workflow that turns vague feature ideas into structured specifications, implementation plans, and dependency-ordered task lists before a single line of code is written
- DevContainers — a VS Code / GitHub Codespaces feature that pins the exact development environment in a
.devcontainer/devcontainer.jsoncommitted to the repository - Azure Developer CLI (
azd) — a CLI that standardises repository layout and enables one-command provisioning and deployment to Azure
Who this is for
Developers building on Azure who are comfortable with Git and VS Code but haven't yet established a structured, AI-assisted development workflow.
Prerequisites
- Git and VS Code installed locally
- Docker Desktop (or Rancher Desktop / Podman Desktop) for running the DevContainer — or access to GitHub Codespaces
- An active Azure subscription (required for the
azd upstep) - A GitHub Copilot license (Individual, Business, or Enterprise) if you want to use the cloud agent path in Step 8
By the end you will have a working repository: containerised for reproducibility, deployable to Azure Container Apps with a single command, and pre-wired for the full spec-kit SDD pipeline.
The Four Tools — What They Are
Before the demo, here is a quick orientation on each component. If you are already familiar with any of these, feel free to skip ahead.
Spec-Driven Development with spec-kit
Spec-Driven Development (SDD) is a practice: write the what and the why — as a structured specification — before writing any implementation code. The spec becomes the contract between you, your team, and your AI assistant. Instead of re-explaining the same context every time you open a chat window, the context lives in the repository and is injected automatically.
spec-kit is the tooling that makes SDD practical. It is a CLI and VS Code workflow that sequences feature development through four reusable commands:
| Command | Output | Purpose |
|---|---|---|
/speckit.specify |
spec.md |
Captures what to build and why |
/speckit.plan |
plan.md |
Adds technical decisions and a validation plan |
/speckit.tasks |
tasks.md |
Breaks the plan into dependency-ordered tasks |
/speckit.implement |
Code + PR | Executes the tasks (locally or via cloud agent) |
Each command builds on the previous one. The spec tells the plan what to solve; the plan tells the tasks what to build; the tasks tell the agent how to implement it. The chain is deliberate — you don't skip ahead to implementation until the earlier questions are answered.
The key enabler is the constitution — a configuration file at .specify/memory/constitution.md that records your project's target cloud, IaC language, deployment model, and primary runtime. Every spec, plan, and task generated by spec-kit embeds these values automatically. The AI doesn't need to guess; the context is always present.
Version (2026-04-14)
spec-kit 0.6.2 — installed via pip install git+https://github.com/github/spec-kit.git@v0.6.2
DevContainers
A DevContainer is a Docker container defined in a .devcontainer/devcontainer.json file committed to the repository. When a developer opens the project in VS Code (or GitHub Codespaces), the editor builds — or reuses — this container and runs the development environment inside it.
The practical result: every contributor gets exactly the same Python version, Azure CLI build, azd binary, and Node.js runtime, regardless of their local machine setup. Onboarding goes from "spend a day getting the environment right" to "clone → Open in Container → start coding."
Beyond consistency, the DevContainer also makes the toolchain self-documenting. A new contributor doesn't need a setup wiki — they open the repo, accept the prompt to reopen in a container, and the environment is ready. The devcontainer.json is the setup guide.
For this tutorial, the DevContainer installs spec-kit and all application dependencies automatically via postCreateCommand, so the entire toolchain is ready the moment the container finishes building.
Version (2026-04-14)
Base image: mcr.microsoft.com/devcontainers/python:1-3.12-bullseye
Azure Developer CLI (azd)
azd is an open-source CLI from Microsoft that standardises how Azure projects are structured and deployed. Two conventions matter for this post:
- Repository layout —
src/for application code,infra/for Infrastructure as Code (Bicep), andazure.yamlas the project manifest - One-command deployment —
azd upprovisions the Azure resources defined ininfra/and deploys the application fromsrc/in a single workflow, no manual portal steps required
The src/infra split enforces separation of concerns from day zero. Infrastructure and application code evolve independently. azd up from the command line is the fastest inner loop — provision, build, and deploy in a single command, which is exactly what you want while iterating on a feature. When you are ready to stabilise, azd pipeline config scaffolds either a GitHub Actions workflow or an Azure DevOps pipeline from the same azure.yaml — no rework required, because the deployment contract is already defined.
The standardised layout also benefits spec-kit: because the directory structure is predictable, the constitution can reference containerapp as the deployment host and spec-kit will produce plans and tasks that assume the right structure every time.
Version (2026-04-14)
azd version: verify by running azd version inside the DevContainer before publication
GitHub Copilot Cloud Agent
The GitHub Copilot cloud agent is a feature that lets you assign a GitHub issue to GitHub Copilot as the implementor. The agent reads the issue and any referenced context (including tasks.md, spec.md, and .github/copilot-instructions.md), implements the feature autonomously, and opens a pull request against your repository.
In the context of this SDD workflow, the cloud agent's input is the tasks.md generated by /speckit.tasks. The spec, plan, and constitution provide enough structured context for the agent to operate without back-and-forth. You come back to a pull request rather than a running chat session.
The PR is not a bonus feature — it is the built-in human oversight gate. You review the generated changes against spec.md's acceptance criteria before anything reaches main.
License required
Using the GitHub Copilot cloud agent requires a GitHub Copilot Individual, Business, or Enterprise license. If you don't have one, Step 8 covers the local VS Code alternative — same output, interactive.
Why These Three Tools Belong Together
Each tool solves a different layer of the predictability problem that makes AI-assisted development frustrating without a structured setup.
Layer 1 — Intent (spec-kit): AI models produce better output when given structured, project-specific requirements. Without a spec, you re-describe the same context every session and hope the AI extrapolates correctly. With a spec, the context is durable, reviewable, and version-controlled. The spec is the prompt — just a much better one that doesn't evaporate when you close the chat window.
Layer 2 — Environment (DevContainers): Even a perfect spec falls apart if two developers are running different Python versions or a different azd build. The DevContainer makes the environment a first-class artifact: committed, versioned, and reproducible. CI pipelines, Codespaces, and local machines all run the same image. The environment stops being a variable.
Layer 3 — Deployment (azd): A clean src/infra layout and azure.yaml manifest means the spec can reference the deployment target accurately (Azure Container Apps, consumption plan) and azd up closes the loop from merged code to a running Azure revision. No manual portal steps, no undocumented deployment scripts sitting in someone's notes app.
These three layers reinforce each other in concrete ways:
- The constitution tells spec-kit the deployment model — so every spec and task file is accurate for ACA from the start, not for App Service or Functions
- The DevContainer pre-installs
azd— so the CLI is available immediately inside the container without a separate setup step azd'ssrc/infralayout gives spec-kit a consistent directory structure to reference in every plan it generates
The fourth layer — delegation (Copilot cloud agent): Once the repository has a spec, plan, and tasks in place, you can assign the implementation to the cloud agent. The agent works asynchronously; the structured context from the three layers means it can operate without prompting you for clarifications. When the PR appears, the review is against the acceptance criteria you already wrote in the spec — not against your memory of what you asked for.
Three tools solving three layers, with the cloud agent as the multiplier at the top.
The Demo — Setting Up Your Repo
We will build a minimal Python (FastAPI) project from scratch. The demo app is a single /health endpoint returning {"status": "ok"}. The application is deliberately small — the point is the tooling workflow, not the feature itself.
Step 1 — Bootstrap the Repository
mkdir sdd-demo && cd sdd-demo
git init
git branch -M main
mkdir .devcontainer
Create .devcontainer/devcontainer.json:
{
  "image": "mcr.microsoft.com/devcontainers/python:1-3.12-bullseye",
  "features": {
    "ghcr.io/devcontainers/features/azure-cli:1": {},
    "ghcr.io/azure/azure-dev/azd:0": {}
  },
  "postCreateCommand": "pip install fastapi uvicorn && pip install git+https://github.com/github/spec-kit.git@v0.6.2"
}
What each features entry does:
azure-cli:1— installsaz, the Azure CLI, pinned to the v1 stable trackazure-dev/azd:0— installs the Azure Developer CLI from Microsoft's official devcontainer feature, pinned to the v0 major track
The postCreateCommand installs the FastAPI application dependencies and spec-kit in a single step when the container finishes building. Because the base image is already Python 3.12, pip is available immediately — no Node.js or npm required. The entire toolchain — Python 3.12, Azure CLI, azd, and spec-kit — is pinned and ready.
Open the folder in VS Code and select "Reopen in Container" from the Remote Window icon (bottom-left corner, or via the Command Palette). The container will build on first open — this takes a few minutes. Subsequent opens reuse the cached image and start in seconds.
Version (2026-04-14)
Base image: mcr.microsoft.com/devcontainers/python:1-3.12-bullseye
VS Code Dev Containers extension: verify version at time of publication
Step 2 — Scaffold the azd Project Structure
All subsequent commands run inside the DevContainer terminal.
mkdir -p src/app infra
Create src/app/main.py — the entire demo application in under ten lines:
from fastapi import FastAPI

app = FastAPI()

@app.get("/health")
def health():
    return {"status": "ok"}
Create src/Dockerfile:
FROM python:3.12-slim
WORKDIR /app
COPY requirements.txt .
RUN pip install -r requirements.txt
COPY app/ .
CMD ["uvicorn", "main:app", "--host", "0.0.0.0", "--port", "80"]
Create src/requirements.txt:
fastapi
uvicorn[standard]
Create azure.yaml in the repository root:
name: sdd-demo
services:
  api:
    project: ./src
    language: python
    host: containerapp
    docker:
      remoteBuild: true
The host: containerapp key instructs azd to build a container image, push it to Azure Container Registry, and deploy it as an Azure Container App revision.
Now create the infrastructure. Instead of hand-rolling Bicep resources, use Azure Verified Modules (AVM) — a Microsoft-curated registry of security-validated Bicep modules at br/public:avm/. Every AVM module is tested, peer-reviewed by the Azure engineering team, and enforces security and compliance best practices by default. Using AVM means your infrastructure inherits those validations for free rather than having to implement them yourself, with the possibility to use the WAF-aligned modules.
Create infra/main.bicep:
targetScope = 'resourceGroup'

@description('Location for all resources.')
param location string = resourceGroup().location

@description('Container image to deploy (set by azd during deployment).')
param containerImage string = 'mcr.microsoft.com/azuredocs/containerapps-helloworld:latest'

// User-Assigned Managed Identity — AVM module
module identity 'br/public:avm/res/managed-identity/user-assigned-identity:0.5.0' = {
  name: 'identity-deployment'
  params: {
    name: 'id-sdd-demo'
    location: location
  }
}

// Azure Container Registry — AVM module
module registry 'br/public:avm/res/container-registry/registry:0.12.1' = {
  name: 'acr-deployment'
  params: {
    name: 'acrsddemo${uniqueString(resourceGroup().id)}'
    location: location
    acrSku: 'Basic'
    roleAssignments: [
      {
        principalId: identity.outputs.principalId
        roleDefinitionIdOrName: 'AcrPull'
        principalType: 'ServicePrincipal'
      }
    ]
  }
}

// ACA Environment — AVM module
module environment 'br/public:avm/res/app/managed-environment:0.13.2' = {
  name: 'env-deployment'
  params: {
    name: 'aca-env-sdd-demo'
    location: location
    zoneRedundant: false
    publicNetworkAccess: 'Enabled'
  }
}

// Container App — AVM module
module containerApp 'br/public:avm/res/app/container-app:0.22.0' = {
  name: 'app-deployment'
  params: {
    name: 'api'
    location: location
    tags: { 'azd-service-name': 'api' }
    environmentResourceId: environment.outputs.resourceId
    managedIdentities: {
      userAssignedResourceIds: [ identity.outputs.resourceId ]
    }
    registries: [
      {
        server: registry.outputs.loginServer
        identity: identity.outputs.resourceId
      }
    ]
    containers: [
      {
        name: 'api'
        image: containerImage
        resources: { cpu: '0.25', memory: '0.5Gi' }
      }
    ]
    ingressExternal: true
    ingressTargetPort: 80
  }
}

output containerAppFqdn string = containerApp.outputs.fqdn
output AZURE_CONTAINER_REGISTRY_ENDPOINT string = registry.outputs.loginServer
Create infra/main.parameters.json:
{
  "$schema": "https://schema.management.azure.com/schemas/2019-04-01/deploymentParameters.json#",
  "contentVersion": "1.0.0.0",
  "parameters": {}
}
AVM module versions
Versions above (registry:0.12.1, managed-environment:0.13.2, container-app:0.22.0) validated 2026-04-14. Before publication, re-verify the latest stable versions at the AVM module registry after any azd up test — AVM releases frequently.
You can generate this with spec-kit too
The infra/main.bicep above is provided to show what the repository structure looks like. In a real project, you would use /speckit.plan to generate both the technical plan and the Bicep scaffolding — the constitution already knows your IaC language is Bicep and your deployment target is ACA, so the generated plan will reference AVM modules automatically. The hand-written sample here is a reference point, not a prerequisite.
Your project structure now looks like this:
sdd-demo/
├── .devcontainer/
│   └── devcontainer.json
├── azure.yaml
├── infra/
│   ├── main.bicep
│   └── main.parameters.json
└── src/
    ├── app/
    │   └── main.py
    ├── Dockerfile
    └── requirements.txt
azd reads azure.yaml + infra/main.bicep together — the manifest describes what to deploy, the Bicep describes how to provision it. That pairing, combined with the AVM modules, is all azd up needs.
Version (2026-04-14)
azd 1.23.15 — Azure CLI 2.18.0 — validated inside the DevContainer at time of writing.
Step 3 — Install and Initialise spec-kit
If the DevContainer was built with the postCreateCommand above, spec-kit is already installed. Confirm:
specify version
Initialise spec-kit in the repository root. The --here flag initialises in the current directory; --ai copilot wires up the VS Code GitHub Copilot prompt files:
specify init --here --ai copilot
Running in a non-empty directory
If you created files in Steps 1 and 2 before running specify init, the CLI will ask: Do you want to continue? [y/N]. Type y to proceed — specify init will merge the .specify/ scaffolding into the existing directory without overwriting your files.
This creates the .specify/ directory and populates .github/ with Copilot prompt files:
sdd-demo/
├── .devcontainer/
├── .github/
│   ├── agents/        # 14 .agent.md files — spec-kit agent definitions
│   └── prompts/       # 14 .prompt.md files — /speckit.* slash command implementations
├── .specify/
│   ├── extensions.yml          # Hook configuration (before_specify, after_implement, etc.)
│   ├── init-options.json       # Records AI integration, branch numbering, spec-kit version
│   ├── memory/
│   │   └── constitution.md     # Project constitution — fill this out in Step 4
│   ├── scripts/
│   │   └── bash/               # Helper scripts invoked by spec-kit prompt commands
│   └── templates/
│       ├── agent-file-template.md
│       ├── checklist-template.md
│       ├── constitution-template.md
│       ├── plan-template.md
│       ├── spec-template.md
│       └── tasks-template.md
├── infra/
└── src/
The .github/prompts/ files are what expose /speckit.specify, /speckit.plan, and the other commands in VS Code Copilot Chat — this is why --ai copilot is required for the workflow to work. The templates/ directory contains the scaffolding each command uses to generate output. The memory/ directory stores context that persists across all feature work on this repository.
Version (2026-04-14)
spec-kit 0.6.2 — installed via pip install git+https://github.com/github/spec-kit.git@v0.6.2
Step 4 — Configure the spec-kit Constitution
Open .specify/memory/constitution.md. The spec-kit init command creates a template with placeholder values. Replace the relevant fields with your project's specifics. For this demo:
# Project Constitution v1.0.0

## Project Identity

**Project name**: sdd-demo
**Primary language / runtime**: Python 3.12 / FastAPI

## Technical Standards

**Target cloud**: Azure
**IaC language**: Bicep
**Deployment model**: Azure Container Apps (consumption plan)
**Container registry**: Azure Container Registry

## Code Standards

**Languages in scope**: Python
**Test framework**: pytest
**Linting**: ruff
The four fields that most affect AI output quality are:
- Target cloud —
Azure→ every spec references the correct cloud services, not AWS or GCP defaults - IaC language —
Bicep→ plans reference Bicep syntax, not Terraform or ARM JSON - Deployment model —
Azure Container Apps (consumption plan)→ tasks are written for ACA, not App Service or Functions - Primary runtime —
Python 3.12 / FastAPI→ implementation tasks target the correct language and framework
You do not need to annotate every field in the constitution on day one. The four above have the highest impact on correctness. Fill in additional fields (test framework, linting rules, naming conventions, approved Azure regions) as your project conventions solidify.
From this point on, every time you run /speckit.specify, /speckit.plan, or /speckit.tasks, these values are injected into the AI context automatically.
Step 5 — Create the First Feature Spec
Open VS Code Copilot Chat set to Agent mode, and run:
/speckit.specify Add a /health endpoint that returns {"status": "ok"}
spec-kit creates specs/001-health-endpoint/spec.md. Here is an excerpt of what the generated spec looks like:
# Feature Specification: Health Endpoint

**Status**: Clarifying

## Feature Summary

Add a `/health` endpoint to the FastAPI application that returns `{"status": "ok"}`
with HTTP 200.

## Technical Context (from constitution)

- **Deployment target**: Azure Container Apps (consumption plan)
- **Runtime**: Python 3.12 / FastAPI
- **IaC**: Bicep

## Acceptance Criteria

- GET /health returns HTTP 200
- Response body is exactly `{"status": "ok"}`
- Endpoint is accessible from the ACA FQDN after `azd up`
Notice the **Status**: Clarifying marker at the top and how the Technical Context block is populated from your constitution — you did not type those values; spec-kit injected them from .specify/memory/constitution.md.
If spec-kit detects any underspecified areas in your input, it marks them with [NEEDS CLARIFICATION] inline. Running /speckit.clarify after /speckit.specify asks targeted questions and encodes the answers back into the spec. For this simple endpoint the spec is clear, so no clarification pass is needed.
Step 6 — Generate the Plan
With the spec complete, generate the implementation plan:
/speckit.plan
spec-kit creates specs/001-health-endpoint/plan.md. The plan adds what the spec omits: technical decisions, validation strategy, and a constitution compliance check. An excerpt:
## Constitution Check

- [x] Target cloud: Azure ✓
- [x] IaC language: Bicep ✓
- [x] Deployment model: Azure Container Apps (consumption plan) ✓
- [x] Primary runtime: Python 3.12 / FastAPI ✓

## Technical Decisions

- Route defined in `src/app/routes/health.py`; registered in `main.py`
- No authentication on `/health` (liveness probe pattern)
- Validation: `curl <ACA_FQDN>/health` returns `{"status": "ok"}`
The constitution check gates confirm the plan is aligned with your declared standards. If any gate fails — for example, if a plan references Terraform instead of Bicep — spec-kit surfaces the mismatch before implementation begins, not after code review.
Step 7 — Generate Tasks
/speckit.tasks
spec-kit creates specs/001-health-endpoint/tasks.md — a dependency-ordered task list that serves as the implementation contract for either you or the cloud agent. An excerpt:
## Phase 1: Setup

- [ ] T001 [P] Create `src/app/routes/health.py` with GET `/health` handler
- [ ] T002 [P] Register health router in `src/app/main.py`

## Phase 2: Tests

- [ ] T003 Write unit test: GET `/health` returns HTTP 200 and `{"status": "ok"}`

## Phase 3: Deployment Validation

- [ ] T004 Run `azd up` and confirm ACA revision is running
- [ ] T005 `curl <ACA_FQDN>/health` returns `{"status":"ok"}`
Tasks marked [P] can run in parallel. The dependency order means implementation does not start deployment validation before the route and tests exist. This deterministic ordering is what makes it safe to hand tasks.md to an autonomous agent — the agent cannot skip ahead to a step that depends on an incomplete earlier one.
Step 8 — Delegate to the GitHub Copilot Cloud Agent
GitHub Copilot license required
The cloud agent path requires a GitHub Copilot Individual, Business, or Enterprise license. If you don't have one, see the Local alternative at the end of this step.
With tasks.md generated, push the feature branch to GitHub:
git add .
git commit -m "feat: add health endpoint spec, plan, and tasks"
git push origin HEAD
On GitHub.com, open your repository and navigate to Issues. Create an issue for the health endpoint feature — something like "Implement health endpoint (see specs/001-health-endpoint/tasks.md)" — and assign GitHub Copilot as the assignee.
The cloud agent will:
- Read the issue description and referenced context files
- Use
.github/copilot-instructions.md(if present) as additional project-wide context - Execute each task from
tasks.mdin dependency order - Open a pull request with the implementation
When the PR appears, review the diff against spec.md's acceptance criteria:
- Does
GET /healthreturn HTTP 200? ✓ - Is the response body exactly
{"status": "ok"}? ✓ - Is the route registered in
main.py? ✓ - Does any test cover the endpoint? ✓
The PR is the human oversight gate in the SDD workflow. Nothing reaches main without a review — even when the implementation is AI-generated. Merge when you are satisfied.
Local alternative (no Copilot license required):
Open VS Code Copilot Chat in Agent mode and run:
/speckit.implement
The agent processes tasks.md in order and writes the implementation interactively in your editor session. The output is identical to the cloud agent path; the difference is that it runs synchronously in your editor rather than asynchronously on GitHub.
Step 9 — Deploy to Azure
With the implementation merged, deploy to Azure Container Apps:
azd auth login
azd up
azd up runs three stages in sequence:
- Provision — creates or updates the Azure resources defined in
infra/(ACA environment, Container Registry, Container App) in the resource group you specify - Build — builds the Docker image from
src/Dockerfile - Deploy — pushes the image to Azure Container Registry and deploys a new Container App revision
Once the command completes, verify the endpoint is live:
curl https://<your-aca-fqdn>/health
# {"status":"ok"}
The FQDN is printed in the azd up output. You can also find it in the Azure portal under your Container App → Overview → Application URL.
To tear down all provisioned resources when you are done:
azd down
From command-line iteration to stable CI/CD
azd up is designed for fast iteration — run it as often as you need while working through the spec-kit pipeline. When the feature is stable and merged, run azd pipeline config to generate either a GitHub Actions workflow or an Azure DevOps pipeline from the same azure.yaml. The scaffolded pipeline calls azd up on every push, so you move from interactive iteration to automated stable deployments without changing any deployment logic.
Version (2026-04-14)
azd 1.23.15 — Azure CLI 2.18.0 — both confirmed inside the DevContainer at validation time.
Resource group used for validation: rg-blog-test
Takeaways & Next Steps
Three tools, one repository — and endless opportunity to build features to your heart's content.
- DevContainer → the environment is a committed artifact; every contributor, CI run, and Codespaces session is identical; onboarding is
git clone → Open in Container → start coding - spec-kit → structured AI context that persists across sessions; specs replace vague prompts with a durable contract that the constitution keeps accurate to the project's actual deployment target
- azd → one-command deployment; the
src/infrasplit enforces separation of concerns and closes the loop from spec to running Azure service; pair it with Azure Verified Modules (AVM) and your infrastructure inherits Microsoft-validated security and compliance defaults rather than having to implement them from scratch —azd upprovisions the AVM-backed resources,azd pipeline configpromotes the same workflow to GitHub Actions or Azure DevOps when you are ready to stabilise
The compounding benefit is real in both directions: a spec without a DevContainer drifts across machines; a DevContainer without a spec gives AI no context; azd without a spec produces code that doesn't know its own deployment target. Together they make the AI's job tractable and the human review step meaningful rather than ceremonial.
This pattern is not limited to a single microservice. It scales naturally to any application shape — static web frontends, REST or GraphQL APIs, event-driven services, and full-stack applications with relational or document databases. The constitution is the only thing that changes between project types: swap host: containerapp for host: staticwebapp, update the IaC language, adjust the primary runtime — and every subsequent spec, plan, and task file the pipeline generates is already aligned to that new target without any extra prompting.
After /speckit.implement — iterating on bugs and adjustments
Once the cloud agent (or /speckit.implement locally) has opened a PR, you will almost always find small gaps: a missed edge case, a minor UX tweak, a failing test in a slightly different environment. The most efficient way to handle these is to stay inside the same loop rather than making ad-hoc edits:
- Update the relevant acceptance criteria or add a clarification note directly in
spec.mdortasks.md - Switch VS Code Copilot Chat to Plan mode — describe what needs to change and let Copilot reason through the steps without writing any code yet; review and adjust the plan if needed
- Switch to Agent mode — Copilot executes the plan against your open files, resolving the bug or adjustment within the same spec context
This keeps every change traceable back to the spec and avoids the drift that comes from one-off edits that bypass the pipeline. For anything larger than a minor fix, run /speckit.tasks again to regenerate the task list before delegating back to the cloud agent.
What to explore next:
- spec-kit documentation and GitHub repository — constitutions, template customisation, and the full extensions system
- Azure Developer CLI template gallery — ready-made
azdproject templates including Azure Container Apps starters - DevContainers feature reference — browse additional features for databases, language runtimes, and infrastructure tools
- Using Dev Containers in VS Code on Windows without Docker Desktop — if you are on Windows and need a Docker Desktop alternative, this post covers WSL2 as an alternative runtime
- Securing Azure Container Apps deployments — once your ACA revision is running, this series covers network isolation, managed identity, and private endpoints
- Follow-up post: "Writing high-quality specs: what makes the difference between a confused AI and a confident one"
- Coming next: Securing your spec-driven development cycle — once the workflow is running, how do you harden it? The follow-up post covers all three layers: infra (AVM policy enforcement, managed identity, Key Vault references), code (keeping secrets out of specs, validating AI-generated changes), and DevOps (branch protection rules, required PR reviewers, and scoping GitHub Copilot agent permissions so the cloud agent only touches what it should)
The best way to learn this workflow is to run through it once end-to-end on a real feature you want to build. Open a terminal inside the container, run /speckit.specify on something you've been meaning to implement, and follow the pipeline through to azd up. The first run takes the longest — every subsequent feature starts from a repository that already knows what it is.